

The easiest way to collect GPS data from the u-blox receivers is simply to plug the receiver into a laptop PC through an FTDI serial to USB converter and run STRSVR or RTKNAVI as I’ve previously described. Of course, if you want to collect base and rover data, that means lugging around two laptops, which if added to the cost of the system, start to make it not look so low cost and also not so convenient since the laptops are so much larger than the receivers.
An inexpensive alternative to the laptop is to configure one of the many linux-based single board computers that are available to collect the data. They can also be used to process the data but in this post I will focus on collecting the data for post-processing later. I have used both Beaglebone and Pi boards to do this and find they each have their advantages.
In this post I will describe setting up a Pi Zero for this purpose. The advantages of the Pi Zero over the Beaglebone are it’s lower price and smaller size. One of the disadvantages is that it does require soldering since there are no host USB ports or headers on the board. The other is that it only has a single UART port, so does not have the flexibility of the Beaglebone. This is important for example if you want to add a radio link for real-time data collection. Like the Beaglebone, it does have an I2C port which can be used to collect magnetometer (digital compass) data if your receiver includes that feature.
The Pi Zero is supposedly a $5 computer but at least at the moment you can only order one at at time and the shipping costs are significant relative to the board price. I paid $13.50 including shipping for the last one I bought from Adafruit. Still, this is less than half the price of the least expensive version of the Beaglebone. Here’s a stock photo of one in case you haven’t already seen it.

In addition to the Pi Zero, you will need a microSD card to use as non-volatile storage for the operating system, programs, and data. I used an 8 GB card available for $5 or less from many sources. I believe any size 4 GB or larger will work. The last things you will need are a USB portable charger (battery pack) to power it and a USB cable. I have bought 10000 mAh units for $10 on Amazon and 2600 mAh units for $5. Both include USB cables but they are power only, you will need a power and data cable for communication between PC and Zero. The 2600 mAh units are sufficiently large to run the Zero and GPS receiver for many hours.
The total cost for a basic logger with an M8N receiver and basic patch antenna is just under $50, using an M8T receiver and/or higher quality antenna will increase the price.
I will describe the process I went through to connect the receiver to the Zero and to configure the Zero to automatically start collecting data when power is applied. I did this using a Windows PC but I imagine it would not be very different if you are using another machine. I am no expert in linux so I relied heavily on cutting and pasting various pieces of code from different tutorials I found online.
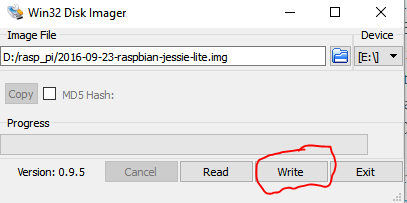
To get started I downloaded three open-source applications to my PC: The first is Putty to communicate with the Zero through SSH over a USB cable and avoid having to hook up a keyboard or HDMI monitor to the Zero. The second is WinSCP to transfer files between the PC and the Zero. WinSCP also includes a convenient file editor that makes it easy to edit files on the Zero directly with a standard GUI interface. The third is WinDiskImager to transfer memory images between the PC and the SD card.
The next step is to copy an operating system onto the microSD card. I used the “2016-09-23-raspbian-jessie-lite.img” version available here, which is currently the most recent stable version of Raspbian Jessie Lite. Raspbian Jessie Lite is a minimal image of linux based on Debian Jessie.
To get the image onto your SD card, download the image to your computer, decompress it, and copy it to the SD card using the “Write” button on WinDiskImager.
Once you have done that, the next step is to configure the operating system on the microSD card for SSH access over USB. This is done with the card plugged into the laptop using a microSD to SD adapter. There is an excellent tutorial here on how to do this by modifying the config.txt and cmdline.txt files in the boot folder so I won’t explain the details here. In the comments section, it also describes how to link the Zero to your network to get internet access. Although not required for this exercise, it is nice to have. Also note that it does require Bonjour, iTunes or Quicktime to be installed on your PC to translate the Zero’s SSH address. If you don’t already have one of these installed, you will need to do that as well.
While you are editing the config.txt and cmdline.txt files in the previous step, there are two more changes you need to make. First, in the config.txt file, add the following line to the end of the file: “init_uart_clock=6000000”. This increases the speed of the UART clock. Without this change you will not be able to run the UART faster than 115200 bps.
Next, in the cmdline.txt file you will find a reference to either serial0 or ttyAMA0. If you are using the same image as I did it will be in the form of: “console=serial0,115200”. Delete this command from the line, then save and close the file. This will free up the UART from it default use as a debug terminal.
Now that the operating system is configured, plug the microSD card into the Zero and connect the Zero to your PC using a USB cable that you know has the data lines hooked up (many USB cables only have power). Verify that you can communicate with the Zero through SSH using Putty (Host Name=raspberrypi.local). There are two micro-USB connectors on the Zero, one is power only, so be sure you use the one labeled USB. You can login to the Zero using the default username=pi, and password=raspberry. Once you are sure this is working, disconnect the Zero for the next step.
Now, we will connect the GPS receiver to the Zero through the UART pins with soldered wires. It is a little more complicated to change the baud rate on the u-blox receiver after it is connected to the Zero, so I would suggest setting the receiver baud rate before doing this step. Be sure to follow up by issuing the CFG-CFG command to save it to flash.
Below is the pin-out of the Zero. TX and RX need to be swapped whenever hooking up a UART so connect TX from the GPS receiver to RXDO (pin 10) on the Zero, and RX from the GPS receiver to TXD0 (pin 8). The solder pads on the edge connector are normally labeled on the GPS receiver. If your receiver has a digital compass it’s output will most likely be on an I2C interface using SDA and SCL pins. If that’s the case hook those up to pins 3 and 5 on the Zero (these don’t get swapped). I won’t talk about collecting data from the compass in this post but at least you will have them hooked up for later.

Here are two data loggers I have built (without antenna or power pack). The receiver on the left is a GY-GPSV3-NEO which does not have a digital compass so there are only four wires. I have used double-stick foam tape to connect the two boards. This unit is set up to run with the antenna included with the receiver which has a very short lead. I like to run the lead through a hole in the ground plane so I need to make sure access to the uFL connector is not blocked by the Zero.
The receiver on the right is a GYGPSV5-NEO which does have a digital compass so there are six wires. In this case I connected the two boards using a machine screw with nylon spacer. This one also has a uFL to SMA adapter cable to connect to my more expensive antennas with SMA connectors. The adapter cable is fairly fragile so I have secured it with a simple L bracket to the receiver board. Note that his board has a DF13 connector, I could have chosen to use that instead of soldering directly to the pads on that end.

Now that the hardware is complete, reconnect the Zero to the PC with the USB cable and re-open a SSH window with Putty. Also start WinSCP and login to the Zero, again using Host Name=raspberrypi.local and username/password = pi/raspberry. When WinSCP connects, the left window will list files on your PC and the right window files on the Zero. Be aware that WinSCP only has permission to copy files into your user space, if you want to copy files anywhere else on the Zero, you will need to login in using that users name and password.
Now we need to copy the RTKLIB source code onto the Zero. You can do this with WinSCP. Copy the rtklib folder from your computer to “/home/pi/rtklib”. Note that none of the windows executables will run on the Zero so there is no need to copy them. We do need to build code though so you will need to copy all the source files. Also copy the “.cmd” file you use to configure the GPS receiver at startup. Put this in a new folder called gps (/home/pi/gps). You can create a new folder on the Zero by right-clicking on the right window.

The demo5 version of the RTKLIB code is available here and there are some sample “.cmd” files for the M8N and M8T receivers in the binaries zip file here.
Once you’ve copied everything over, go to the Putty window, switch to the /home/pi/rtklib/app/str2str/gcc folder and run “make” to build the STR2STR app on the Zero. Copy the STR2STR executable to /usr/local/bin and change its permissions to make it executable. You can do all that by executing these commands from the command prompt:
cd rtklib/app/str2str/gcc
make
sudo cp str2str /usr/local/bin/str2str
sudo chmod +x /usr/local/bin/str2str
You may get a warning from the make process that the build may not be complete because we didn’t update the date and time on the Zero, but you can ignore this.
You should now be able to run the STR2STR app to make sure everything you’ve done so far is working. I use the following command but you may need to adjust it for your baud rate file names/locations etc. Details of the STR2STR command options are in the RTKLIB manual.
str2str -in serial://ttyAMA0:230400#ubx -out rover.ubx -c /home/pi/gps/m8n_gpsglo_5hz.cmd
The output from this command should look something like this:

The output should be in the file rover.ubx. You can use WinSCP to copy this file to your PC and convert and plot it with RTKCONV. If that works fine, you are almost done.
The last step is to create an auto-run script that will run at power-up and start collecting data. We will use the systemctl command to do this. I used this tutorial as an example on how to do it.
First we’ll create the actual script to collect the data. I first tried to do this in python but had an issue with it not working when called during the boot sequence, so switched it to a shell script. Create a new file by maneuvering to your user folder (/home/pi) in WinsSCP then right-click and select New then File. Copy the following text into the file then save as “/home/pi/str2str_start.sh” and exit. You may need to modify the path and str2str command lines in this file to match your file names, locations and baud rate.
#!/bin/bash
path=”/home/pi/gps/”
# find unused file name
i=0
fname=$path”rover”$i”.ubx”
while [ -f $fname ]; do
let “i=i+1”
fname=$path”rover”$i”.ubx”
done
fname=$path”rover”$i”.ubx”
# start task to collect rover data at 5 Hz
str2str -in serial://ttyAMA0:230400#ubx -out tcpsvr://:128 -out $fname -c home/pi/gps/m8n_rover_5hz.cmd &
# check for error by looking for output file
sleep 1
ls $fname
if [ $? -ne 0 ]
then
echo Exit on error
exit
fi
# blink LEDs to let user know all is OK and we are collecting data
X=0
while [ $X -le 0 ]
do
echo 0 > /sys/class/leds/led0/brightness
sleep 1
echo 1 > /sys/class/leds/led0/brightness
sleep 1
done
Now create another new file in the /home/pi folder named gpslog.service. Copy the following text into that file then save and exit. This will run our script during the power up sequence.
[Unit]
Description=Startup Script Service
After=multi-user.target
[Service]
Type=idle
ExecStart=/home/pi/str2str_start.sh
[Install]
WantedBy=multi-user.target
To move the second file into the correct system folder and enable both files, use the following commands:
cd /home/pi
sudo chmod +x str2str_start.sh
sudo mv gpslog.service /lib/systemd/system
sudo systemctl daemon-reload
sudo systemctl enable gpslog.service
To manually test the startup script first without using the autorun task, use the following commands:
sudo systemctl start gpslog.service
sudo systemctl status gpslog.service
The output should look similar to when we ran STR2STR directly. If not, make sure the baud rate and “.cmd” file name and location in the script are correct.
If the output looks OK, then power-cycle the Zero. It should come up and automatically start collecting data and flashing the LED on-board the Zero. You can reconnect with Putty and check the status with the previous command;
sudo systemctl status gpslog.service
The raw output files will be saved in the /home/pi/gps folder and will be named roverxx.ubx where “xx” will increment to the next unused number each run. Use WinSCP to copy this over to your laptop for analysis.
And that’s it, you should now have a fully functional GPS data logger!
Below is a little more info on using your new data logger.
If you look carefully at the script above you will see in the str2str options, that in addition to directing the output to a file, I also directed it to a tcp server (-out tcpsvr://:128). If the Zero is plugged into the laptop, you can see the receiver output real-time using RTKNAVI or the u-blox u-center evaluation software. Instead of connecting to a serial port, connect to a network connection using the address “tcp://xxx.xxx.xxx.xx:128” where xxx.xxx.xxx.xx is the ip address of your Zero. You can get this number by issuing a “ifconfig” command from the Putty window and then using the inet address of usb0.
Unfortunately this connection does not work in both directions so if you want to change the receiver baud rate using u-center you will need to use “socat” to create a virtual port.
Use the following command to install “socat” on your Zero. You will need to be connected to the internet to do this.
sudo apt-get install socat
[Note 12/8/16: For a more complete tutorial on connecting your Zero to the internet, see this tutorial (thanks to Jernej Tekavec for pointing me to this link) ]
Then use the following command to open the virtual port, then connect with u-center as described above. Now the connection will work in both directions and you should be able to change the baud rate with u-center.
sudo socat tcp-listen:128,reuseaddr /dev/ttyAMA0,b38400,raw,echo=0
Here is a complete but unassembled logger on the left with ground plane (aluminum foil glued to cardboard) and waterproof case (Rubbermaid food container). On the right it is assembled but not in the case. I place the receiver/antenna unit face down in the container, put the lid on, then flip it over so the antenna points upwards. If I wanted to make it smaller I could use a smaller battery pack and smaller ground plane, but for my uses this size is fine.


Here is a link to a sample data set I collected with this data logger. It was on a small sailboat while sailing on a lake and got consistent fixes for the duration of the data.

Hello
Thanks for the great tutorial.
It didn’t quite work out of the box but pretty close. I managed to mumble through it and I can get a rover.ubx with results in it.
Where I have hit trouble is that I cant get the auto-start feature to work.
If I run:
str2str -in serial://ttyS0:230400#ubx -out rover_abc.ubx -c /home/oem/gps/f9p_1hz_uart.cmd
It works perfectly and creates a file ‘rover_abc.ubx’ with valid data in it.
So for the auto-start, here is my str2str_start.sh file:
#!/bin/bash
path=”/home/oem/gps/”
find unused file name
i=0
fname=$path”rover”$i”.ubx”
while [ -f $fname ]; do
let “i=i+1”
fname=$path”rover”$i”.ubx”
done
fname=$path”rover”$i”.ubx”
start task to collect rover data at 1 Hz
str2str -in serial://ttyS0:230400#ubx -out $fname -c home/oem/gps/f9p_1hz_uart.cmd &
check for error by looking for output file
sleep 1
ls $fname
if [ $? -ne 0 ]
then
echo Exit on error
exit
fi
(blink code here)
done
When I run the status check I get:
● gpslog.service – Startup Script Service
Loaded: loaded (/lib/systemd/system/gpslog.service; enabled; vendo>
Active: active (running) since Wed 2023-05-17 05:05:14 BST; 29min >
Main PID: 1283 (str2str_start.s)
Tasks: 1 (limit: 414)
CPU: 6min 16.593s
CGroup: /system.slice/gpslog.service
└─1283 /bin/bash /home/oem/str2str_start.sh
May 17 05:34:24 raspberrypi str2str_start.sh[1283]: [107B blob data]
May 17 05:34:24 raspberrypi str2str_start.sh[1283]: [107B blob data]
May 17 05:34:24 raspberrypi str2str_start.sh[1283]: [107B blob data]
May 17 05:34:24 raspberrypi str2str_start.sh[1283]: [107B blob data]
May 17 05:34:24 raspberrypi str2str_start.sh[1283]: [107B blob data]
May 17 05:34:24 raspberrypi str2str_start.sh[1283]: [107B blob data]……
more lines the same following….
So it seems to be running, but is not creating a ‘rover$i.ubx’ file anywhere.
I ran all instructions including the chmod commands etc.
The direct command to create a log file works, so uart and baud rates must be ok, but no file is being created when the auto-start is fired up on powerup.
Any help would be appreciated!
LikeLike
Ok, so if I run the .sh from the command line it works perfectly:
/home/oem/str2str_start.sh
This creates the files, increments the file name, I can watch the data being added to the file, so all good.
oem@raspberrypi:~ $ /home/oem/str2str_start.sh
stream server start
2023/05/17 05:45:31 [CC—] 0 B 0 bps (0) /dev/ttyS0
2023/05/17 05:45:36 [CC—] 8788 B 14252 bps (0) /dev/ttyS0
2023/05/17 05:45:41 [CC—] 18392 B 14408 bps (0) /dev/ttyS0
2023/05/17 05:45:46 [CC—] 27832 B 14826 bps (0) /dev/ttyS0
2023/05/17 05:45:51 [CC—] 37524 B 15474 bps (0) /dev/ttyS0
2023/05/17 05:45:56 [CC—] 46740 B 15689 bps (0) /dev/ttyS0
2023/05/17 05:46:01 [CC—] 56356 B 15936 bps (0) /dev/ttyS0
^Cstream server stop
/home/oem/gps/rover0.ubx
oem@raspberrypi:~ $ /home/oem/str2str_start.sh
stream server start
2023/05/17 05:46:12 [CC—] 0 B 0 bps (0) /dev/ttyS0
2023/05/17 05:46:17 [CC—] 9380 B 14520 bps (0) /dev/ttyS0
2023/05/17 05:46:22 [CC—] 18112 B 14186 bps (0) /dev/ttyS0
2023/05/17 05:46:27 [CC—] 27484 B 15560 bps (0) /dev/ttyS0
^Cstream server stop
/home/oem/gps/rover1.ubx
I have now disabled the service and tried added the command /home/oem/str2str_start.sh to the /etc/rc.local file and it seems to be working perfectly.
For anyone interested, if you wish to then stop the script running you need to identify the PID of the script with this:
ps aux | grep sh
Which gives this:
sh
root 3 0.0 0.0 0 0 ? I< 07:09 0:00 [slub_flushwq]
root 41 0.0 0.0 0 0 ? I< 07:09 0:00 [zswap-shrink]
root 358 0.0 0.2 1960 1268 ? Ss 07:09 0:00 /bin/sh -e /etc /rc.local start
root 365 0.0 0.6 7884 2868 ? S 07:09 0:00 /bin/bash /home /oem/str2str_start.sh
So the PID for the str2str_start.sh script is 365
To stop it:
sudo kill 365
LikeLike
Hello,
I did follow this instruction to get the raw base data via a Raspi 3b and a ublox M8T but It wasn’t successful to obtain a convertible .ubx file. It saves a rover.ubx on my raspi but it cannot be converted.
I also tried to test this instruction with ublox F9P but I couldn’t run the last command () since there is not any F9P command in the “cmd” file.
I do need to get raw base data for GPS, would you please help me?
LikeLike
Hi Golnaz. Generally if the .ubx file contains data, but is not convertible to rinex, the issue is either that the receiver is not configured to output the correct messages or there is a baudrate incompatibility. I would suggest connecting the receiver to a Windows PC first and use the u-blox ucenter app to verify the receiver is configured properly and outputting usable data. This is also an easy way to configure the F9P instead of using a .cmd file, since the F9P can be configured once and the results saved to flash.
LikeLike
Thank you for your help! It worked, and my rover data is now converting to the .nav and .obs files
Now, I am struggling with the “run out of the memory” issues, and I’ve mounted a SMB NAS on my raspi, but the problem is that I couldn’t still find a way to store the stream data of the str2str command (i.e., rover.ubx) on the mounted point, any help would be appreciated.
LikeLike
I would have thought you could assign a drive letter to the NAS and stream to a file using the standard file interface but I’m not a Pi expert so maybe someone else has a suggestion?
LikeLike
When I enter the command: str2str -in serial: // ttyAMA0: 9600 # ubx -out rover.ubx -c /home/pi/gps/m8t_5hz_usb.cmd
It happens to me:
str2str -in serial: // ttyAMA0: 9600 # ubx -out rover.ubx -c /home/pi/gps/m8t_5hz_usb.cmd
stream server start
2020/12/05 11:53:19 [CC —] 0 B 0 bps (0) / dev / ttyAMA0
2020/12/05 11:53:24 [CC —] 0 B 0 bps (0) / dev / ttyAMA0
2020/12/05 11:53:29 [CC —] 0 B 0 bps (0) / dev / ttyAMA0
2020/12/05 11:53:34 [CC —] 0 B 0 bps (0) / dev / ttyAMA0
2020/12/05 11:53:39 [CC —] 0 B 0 bps (0) / dev / ttyAMA0
2020/12/05 11:53:44 [CC —] 0 B 0 bps (0) / dev / ttyAMA0
2020/12/05 11:53:49 [CC —] 0 B 0 bps (0) / dev / ttyAMA0
2020/12/05 11:53:54 [CC —] 0 B 0 bps (0) / dev / ttyAMA0
2020/12/05 11:53:59 [CC —] 0 B 0 bps (0) / dev / ttyAMA0
Can you help me?
LikeLike
Hi Jesuys. It looks like you have some extra spaces in the serial port definition. There should not be any spaces in the argument that follows “-in”
LikeLike
I tried the command without the spaces
Like this: sudo str2str -in serial://ttyAMA0:38400#ubx -out rover.ubx -c /home/pi/gps/m8t_5hz_uart.cmd
But it remains 0b and 0bps, as if it were not saving data.
LikeLike
Hi Jesuys. This means that either no data is coming from the UART or possibly that the baud rate is incorrect. I believe some versions of the Pi use ttyS0 instead of ttyAMA0 so I would verify that first. If that’s OK then I would use another app to monitor the serial port to verify data is streaming. Also, double check that you connected RX to TX and TX to RX between the receiver and the Pi.
LikeLike
Beautiful applications. In addition to data recording, can anyone tell me how to record in raw data the event marker produced by a camera flash in the data? Thank you. Ambrogio
LikeLike
Hi Ambrogio. Did you see this post on event logging with the demo5 code
LikeLike
Hi,
I know it is an old post, but I found it very useful!
In short, is it possible to send out raw measurements over raspberrypi’s usb port?
I know I can reroute the RX TX to FTDI module and have access from there, but
it would be more convenient to just plug into a usb port.
The thing is, I want to have the measurements on android phone and I don’t find a solution to use
the tcp output.
So is it possible to add something like
-out serial://ttyAMA0:115200#ubx
to the startup script? I know ttyAMA0 should be substituted, but with what?
Regards!
Jernej
LikeLike
Hi Jero. Yes, there are many options for the output of the stream servers in RTKLIB including TCP. You can find them all described in Appendix A.5 in the RTKLIB manual.
LikeLike
I know this is an old post but I am trying to create a data logger for a u Blox f9 on the spark development board and this still seems like a good approach. I am close to getting it working but can’t get the script below to work.
I don’t think I have the syntax correct for this line
str2str -in serial://ttyAMA0:230400#ubx -out $fname &
Which is a cut and paste from the tutorial but omitting the write to tcpsvr://:128 and deleting -c home/pi/gps/m8n_rover_5hz.cmd &. I don’t need to write cmd file to the receiver its store in flash memory.
The RTKLIB documentation suggests I need use the work file for something like – out file://$fname . I tried that several times unsuccessfully.
Below is the script I tried running and got any error below.
Any help is greatly appreciated.
Thanks,
David
#!/bin/bash
path=”/home/pi/gps/”
find unused file name
i=0
fname=$path”rover”$i”.ubx”
while [ -f $fname ]; do
let “i=i+1”
fname=$path”rover”$i”.ubx”
done
fname=$path”rover”$i”.ubx”
start task to collect rover data at 5 Hz
str2str -in serial://ttyAMA0:230400#ubx -out $fname &
check for error by looking for output file
sleep 1
ls $fname
if [ $? -ne 0 ]
then
echo Exit on error
exit
fi
blink LEDs to let user know all is OK and we are collecting data
X=0
while [ $X -le 0 ]
do
echo 0 > /sys/class/leds/led0/brightness
sleep 1
echo 1 > /sys/class/leds/led0/brightness
sleep 1
done
May 23 21:08:01 raspberrypi systemd[1]: Starting Startup Script Service…
May 23 21:08:01 raspberrypi systemd[1]: Started Startup Script Service.
May 23 21:08:02 raspberrypi str2str_start.sh[619]: stream server start
May 23 21:08:02 raspberrypi str2str_start.sh[619]: stream server start error
May 23 21:08:03 raspberrypi str2str_start.sh[619]: [74B blob data]
May 23 21:08:03 raspberrypi str2str_start.sh[619]: Exit on error
LikeLike
make sure you replace all “s int he script with correct inverted commas. In the post they were converted to characters that break a shell script. worked for me after.
LikeLike
Hi rtklibexplorer!
Firstly, thank you very much for all the information you share in your website!! it is really useful for the open source GNSS community!!
I am trying to communicate with my ublox M8T evaluation kit with a RasberryPi 3 using str2str. I use the same kind of command that you explain in your post. For the configuration file, I use the file m8t_1hz_usb.cmd from Demo5 b31 binaries that I found in the link you gave us. The command I write looks like this :
./str2str -in serial://ttyACM0:9600:8:0:1:0#ubx -out file:///home/pi/Documents/stream/test.ubx -c /home/pi/PROGRAMS/rtklib_2.4.2/data/data_files/m8t_1hz_usb.cmd
Like this, the communication with the ublox is achieved and I receive the data on the test.ubx file. However, the .cmd file or the command I am using is not working, as in the test.ubx file I find NMEA data (which if I am right, it should be disable with the configuration file m8t_1hz_usb.cmd). I have the same kind of problems with any .cmd file trying to disable NMEA messages.
Have you any idea about how to solve this problem?
Thank you very much.
LikeLike
Hi JN. If the cmd file is not working for you the simplest solution is probably to configure the receiver with u-blox ucenter ahead of time and save the results to flash with the CFG-CFG message. Otherwise, by enabling debug to trace level 5, and then looking in the trace file, you can see the exact sequence of bytes RTKLIB is sending to the receiver. You can then verify these sequences by comparing them to the specification in the M8 Receiver Description document available from the u-blox website.
LikeLike
Hello! I just wish to give a huge thumbs up for the good information you might have here on this post. I will likely be coming back to your blog for more soon.
LikeLike
“One of the disadvantages is that it does require soldering since there are no host USB ports or headers on the board. ” — the Pi Zero does have a micro-USB host port through which you can hook up something like Adafruit’s micro usb hub: https://www.adafruit.com/product/2991
LikeLike
The STR2STR command isn’t well documented in the manual, but I’ve been using a file string as mentioned in https://github.com/tomojitakasu/RTKLIB/issues/268#issuecomment-298222427 to produce sets of timestamp-named files with a file output string like this.
The “::S=6′ on the end of the file swaps files at a Swap Interval of 6 hours, and the “-f=30” means to buffer/overlap the data in the files by 30 seconds. The %Y%m%dT%h%M%S’ gives time strings like ‘20190118T123932’ I like the time-stamped strings to keep the logs distinct in sorted/chronological order.
LikeLike
Hi drf5n. Yes, this is a nice feature of RTKLIB, definitely worth mentioning, and one I often use. By the way, if you are using the RTKLIB windows GUIs, there is a question mark in the “File Options” window below the “Output File Path” Clicking on this will bring up a list of all the available keyword replacement options.
LikeLike
Hi Tim,
you say that these “Linux SBCs” (RPi, Beagle) can also be used for real-time RTKLIB solution. I am about to head into a Raspberry Pi Zero real-time project. Could you please explicitly confirm the Zero has enough computing power to process a real-time solution? I will be using CORS and probably only GPS+GLO. Thanks!
LikeLike
Hi Kozuch. I usually run RTKLIB on Windows so don’t have a lot of experience with linux. I know I have run RTKRCV successfully on a Beaglebone and an UDOO processor but honestly don’t remember if I’ve specifically run it on a Raspberry Pi Zero. My guess is that it would work, but maybe someone else can comment more definitively.
LikeLike
I use a M8T connected to rpi 3b+ for base station, it runs str2str to passtrough the base station data. The rover is a android device which retrieves the base station data and together it’s a realtime gps system. The raspberry pi is very reliable!
LikeLike
The CSG uBlox M8T board is even easier — it has a USB port built in, and can connect directly to your computer or a single board computer like the Raspberry Pi/Pi Zero/Pi Zero W.
LikeLike
Hi Dave. Yes I also like the CSG M8T receivers with USB ports built in and use them frequently with a PC although I haven’t tried connecting them to a single board computer. It seems like a good idea though.
LikeLike
I would like having ahat with display and battery, so I may check if the logging works ok….
any recommendations.
LikeLike
HI.
My gps module connecting via USB. Can i convert ubx to RTCM3 and sent the data to UART port with the pi zero?
I must have the convertion since I want to transmit data via 3DR (UART mode) and the stable max rate is 57000.
LikeLike
Hi Dimitris. Yes, STR2STR (and STRSVR) can be configured to convert the output stream from ubx to RTCM3. With STRSVR this is done by clicking on the “Conv” box and setting the desired conversion. With STR2STR it is specified on the command line. See the RTKLIB manual for details on how to do this.
LikeLike
O.K Thanks
But 1 problem 😦
1st: the RTCM3 (in STRSVR windows) is not stable. When i use this option (and test it as rover in rtknavi demo5 b29a ) the solution gone mad after a while. it’s floating and “travels” 200m in circle on X-Y and 500m up-down in Z. I test everything even 1077 and 1087 MSG but nothing.
LikeLike
Hi Dimitris. I have not seen this issue. If you can log an example of this and send me the data I will take a look.
LikeLike
sorry but
I have disconnect all to create a base with a raspberry.
if it’s not success i wil
PS since now i can’t make it work since my gps is usb
LikeLike
in command
str2str -in serial://ttyUSB0:230400#ubx -out rover.ubx -c /home/pi/gps/m8n_5hz.cmd
i get
stream server start
stream server start error
whats the problem ?
LikeLike
O.K. I solve it using
sudo str2str -in serial://ttyACM0#ubx
but now the command
sudo str2str -in serial://ttyACM0#ubx -out serial://ttyAMA0:115200:8:n:1:off#rtcm3 -c /home/pi/gps/m8n_1hz.cmd
sending nothing in the other side of 3DR.
to be continue !!!
LikeLike
Hello! I want to use Beidou.
I changed “!UBX CFG-GNSS 0 32 32 1 3 8 16 0 0” to “!UBX CFG-GNSS 0 32 32 1 3 8 16 0 1” in m8n_gpsglo_5hz.cmd file, but Beidou could not receive it.
What kind of setting is necessary to receive GPS and Beidou?
LikeLike
I am using Neo-M8T.
LikeLike
Hi June.
To enable Beidou, for 8-16 sats you would use the following command
!UBX CFG-GNSS 0 32 32 1 3 8 16 0 65537
Be aware though, that the M8T only supports two constellation frequencies, so you would have to turn of GLONASS before enabling Beidou.
LikeLike
Hi. Very very thank you for your advice.
I succeeded in recording BeiDou.
I did not turn off GLONASS.
!UBX CFG-GNSS 0 32 32 1 6 8 14 0 0
LikeLike
Hi June. This table, from the u-blox M8 data sheet shows the different combinations of constellations that the M8 can support simultaneously. It can only support two different frequencies so can not support GPS/Galileo, GLONASS and Beidou at the same time. If you try to enable all three, it will only use the two that you enable first and will not allow you to enable the third. It is possible to have GLONASS and Bediou enabled together, but this would mean that GPS/Galileo was disabled. This would probably not be a good choice given the limitations of GLONASS ambiguity resolution.
GPS Galileo GLONASS BeiDou
• • – –
• • • –
• • – •
• – • –
• – – •
– • • –
– • – •
– – • •
Table 2 Permissible GNSS combinations (• = enabled)
Also be aware of this comment from the M8 receiver description, also available on the u-blox website.
“Users should be aware that switching between GNSS (and especially away from GPS) may affect the long term accuracy of the receiver until the next cold start. In normal operation the receiver selects the best models and corrections from the transmitted auxiliary data (e.g. UTC and Ionospheric parameters), basing this selection on the configured GNSS. Disabling a major GNSS prevents auxiliary data from that GNSS being refreshed and so it will become stale, resulting in progressively degraded performance. This can occur even if the main power supply is removed, as most receivers retain auxiliary data in non-volatile storage, e.g. Battery Backed RAM (BBR). For this reason, u-blox recommends that receivers are cold started after any change that disables an active GNSS, within a few weeks, but preferably immediately. This will ensure that the receiver then uses only regularly refreshed information from the newly configured constellations”
LikeLike
I appreciate your wonderful solution.
I got an error at MAKE of str2str.
cc -c -Wall -O3 -ansi -pedantic -Wno-unused-but-set-variable -I../../../src -DENAGLO -DENAGAL -DENAQZS -DENACMP -DENAIRN -DTRACE -DNFREQ=3 -DNEXOBS=3 -DSVR_REUSEADDR -g ../str2str.c
../str2str.c: In function ‘decodefmt’:
../str2str.c:153:44: error: ‘STRFMT_SS2’ undeclared (first use in this function)
else if (!strcmp(p,”#ss2″ )) *fmt=STRFMT_SS2;
^
../str2str.c:153:44: note: each undeclared identifier is reported only once for each function it appears in
makefile:22: recipe for target ‘str2str.o’ failed
make: *** [str2str.o] Error 1
Could you give me some advice?
LikeLike
Hi June. Sorry, my fault … I missed a couple changes in the linux files in my last release. I’ve just updated my Github page with the missing changes.
LikeLike
Hello,
First of all congrats for your excellent content.
I am thinking of making a base/rover for small survey projects. Of course I will be using m8t or m8n chips although they are not available easily here in Greece. I have 2 questions:
1)My survey projects will also be to mountain-ish locations and i don’t know what chip to choose in order to keep the cost low.what do you suggest for that?
2) Can i set a base with m8t and a rover with m8n? Is this setup capable of cm accuracy?
LikeLike
Hi George. I’d go with a pair of M8T’s. The cost is still very low compared to almost any other option out there and it will give you better performance than the M8Ns in a matched receiver pair setup since you will be able to use the GLONASS satellites for initial ambiguity resolution which you can’t do with a pair of M8N’s or an M8N/M8T combination. Also, see my recent post on problems getting the debug messages on the newest M8N’s.
LikeLike
Thanks for the fast comment!
So 2 of m8t’s paired with pi zero w’s seems a good pack??or pi 3 is a better choice?
LikeLike
Hi George. I think either will work. Pi 3 has more serial ports than the pi Zero W which could be useful if you want to add radios or other IO
LikeLike
Have you ever tried to implement Reach View to any of these setups?
https://github.com/emlid/ReachView
LikeLike
Hi George. No I have not tried that.
LikeLike
Hello!
I am using the Pi Zero W with the Evaluation Kit of the Neo M8T. It works just fine when I start the stream server directly via str2str and when I start the str2str_start.sh, but when I let the gpslog.service do its work, the stream server stops immediately after creating the file (see output below).
pi@raspberrypi:~ $ sudo systemctl -l status gpslog.service
● gpslog.service – Startup Script Service
Loaded: loaded (/lib/systemd/system/gpslog.service; enabled)
Active: inactive (dead) since Mon 2017-04-10 13:02:55 UTC; 10s ago
Process: 669 ExecStart=/home/pi/str2str_start.sh (code=exited, status=0/SUCCESS)
Main PID: 669 (code=exited, status=0/SUCCESS)
Apr 10 13:02:53 raspberrypi systemd[1]: Started Startup Script Service.
Apr 10 13:02:54 raspberrypi str2str_start.sh[669]: stream server start
Apr 10 13:02:54 raspberrypi str2str_start.sh[669]: 2017/04/10 13:03:12 [CC—] 0 B 0 bps (0) /dev/ttyS0
Apr 10 13:02:55 raspberrypi str2str_start.sh[669]: /home/pi/gps/rover2.ubx
Apr 10 13:02:55 raspberrypi str2str_start.sh[669]: stream server stop
Do you have any idea what could cause this issue and how to fix this?
Thanks in advance
LikeLike
Hi CK. I suspect you may be having a permissions problem of some sort but linux debug is not something I’m particularly good at.
LikeLike
Hi,
I managed to get a workaround for the problem. I added str2str_start.sh to /etc/rc.local (make sure it runs at startup) instead ofusing the service.
LikeLike
Hi, rtklibexplores!!!
First of all, thank you for your tutorials.
I have followed all the steps with the NEO M8T and the raspberry pi zero and everything seems to go well until I try to convert the ubx file (rover.ubx) into RINEX format. Using RTKCONV & CONVBIN with the file created with the raspberry nothing happens: no rinex file is created (the ubx seems to be empty). Connecting the M8T directly with RTKNAVI, it works fine. I’m stacked with the raspberry .ubx files. What can I do?
Thanks in advance
LikeLike
Hi Javiramundo. If you are getting a .ubx file but can’t convert it to RINEX, my best guess is that the baud rates are not setup to be the same for the receiver and the Raspberry Pi.
LikeLike
Problem solved!!!! I had double checked before asking for help but it seems I should have to check triple 😉
Thank you very much!!!
LikeLike
The new model…
https://www.raspberrypi.org/blog/raspberry-pi-zero-w-joins-family/
LikeLike
Hi friends, I plan to develop a project using a raspberry pi 2 and the 3DR radios system. I modified the script used with Pi zero by adding a button and two leds to indicate that the data collection is running. I would like suggestions.
Thank you
#!/bin/bash
path=”/home/pi/gps_rtk/”
import RPi.GPIO as GPIO
GPIO.setmode(GPIO.BOARD)
GPIO.setwarnings(False)
btn=17
LED1=16
LED2=15
GPIO.setup(btn, GPIO.IN,pull_up_down=GPIO.PUD_UP)
GPIO.setup(LED1,GPIO.OUT)
GPIO.setup(LED2,GPIO.OUT)
BS=False
while(1)
do
if GPIO.input(btn)==0
then
print “=== START ===”
if BS==False
then
#Cria e nomeia os arquivos em função da data
time=$(date “+%H%M%S-%d%m_%y”)
fname_R=$path”rover_”$time”.ubx”
fname_B=$path”base”$_time”.ubx”
#ROVER — 5Hz — Radio Link
str2str -in serial://ttyUSB0:230400:8:n:1:#ubx -out /home/pi/gps_rtk/ -out $fname_R -c home/pi/gps/m8n_rover_5hz.cmd &
#BASE — 1Hz — Radio Link
str2str -in serial://ttyUSB1:115200:8:n:1:#ubx -out /home/pi/gps_rtk/ -out $fname_B -c home/pi/gps/m8n_base_1hz.cmd &
GPIO.output(LED1,True)
GPIO.output(LED2,False)
BS=True
sleep(1)
else
GPIO.output(LED2,True)
GPIO.output(LED1,False)
BS=False
str2str Ctrl-C
print “=== STOP ===”
sleep(1)
fi
fi
done
LikeLike
Hi friend,
Is it possible to use this code to adapt the radio link system? (Replacing the computer portable with the raspberry pi)
How would that part of the code look?
start task to collect rover data at 5 Hz
str2str -in serial://ttyAMA0:230400#ubx -out tcpsvr://:128 -out $fname -c home/pi/gps/m8n_rover_5hz.cmd &
LikeLike
#start task to collect rover data at 5 Hz
rtkrcv -in serial://ttyAMA0:230400#ubx -out in serial://ttyAMA0:230400#ubx -out $fname -c home/pi/gps/m8n_rover_5hz.cmd &
RTKRCV
LikeLike
Hi Neilon, I believe the pi zero has only one UART so you would have to figure out how to communicate to the radio with something other than the UART or choose a SBC like the Beaglebone that has more than one UART. Also the options format for rtkrcv are different from str2str. You will need a configuration file for the solution parameters which can include the input and output stream configurations as well.
LikeLike
Understand. In my project I’m going to use a raspberry pi 2 (4 usb port) and 3DR radios (1 USB – Base and 1 UART – Rover).
So I should create new configuration files for rtkrcv. I looked in the manual and did not find it. Where can I find it?
Thank you
LikeLike
Hi Neilon. Section B.4 in the RTKLIB manual describe the config file format and options, it is the same for RTKNAVI, RTKRCV, RTKPOST, or RNX2RTKP. Appendix A.1 describes the input options for RTKRCV including how to specify the config file in the command line.
LikeLike
Have you ever tried OpenLog from SparkFun? This tiny module worked perfectly for me at 115200 bps (5Hz RAW+NMEA) output. It works right out of the package, no need to install anything.
LikeLike
Hi Krill. How do you send commands to the u-blox receiver to configure it to output RAW commands with this logger? With the Pi logger, I run the STR2STR app from RTKLIB to do this but it is not obvious you can do the same with this logger, at least not right out of the package without installing anything.
LikeLike
With receivers, equipped with NVRAM or flash memory, it is only required to configure them once with uCenter, for example. So, yes, it is not a universal solution.
LikeLike
@rtklibexplorer, do you know any good commands for pausing/temp stopping the script?
LikeLike
Hi Alxg. The systemctl commands below will stop and restart the service/script and give you its current status. This isn’t exactly the same as pausing the script since the receiver will be re-configured and the data will go to a new file when you restart it, but hopefully they will do what you are looking for. The str2str_start.sh script starts STR2STR in a background task then loops around blinking the LED, so pausing the script itself would only pause the LED blinking, not the data stream.
sudo systemctl start gpslog.service
sudo systemctl stop gpslog.service
sudo systemctl status gpslog.service
LikeLiked by 1 person
Thx rtklibexplorer, exactly what I was looking for! 🙂
Btw another tip if someone want timestamped files, these two lines add timestamp to filename and since they change every second there is no need for checking for exisiting files:
_time=$(date “+%H%M%S-%d_%m_%y”)
fname=$path”rover_”$_time”.ubx”
LikeLiked by 1 person
Hi, I would lke to get the timestamp of the my ubx files, where I have to add this in order to get this done, thanks all.
LikeLike
Hi Wilkins. You can enable logging of the time-tag files for any binary receiver files including ubx by checking the time-tag box in the “File options” or “Log streams” windows. Note that RTKNAVI is supposed to be able to emulate a real-time run after the fact by inputting the raw binary file and time-tag files but this capability is broken in the more recent versions of RTKNAVI (at least the 32-bit version, I haven’t tried the 64 bit version since the free version of the Embarcadero compiler doesn’t support 64-bit). It’s possible the 64-bit version does work because I believe the change that broke this capability was introduced when trying to deal with differences between the Windows 32 bit and 64 bit environments.
LikeLike
Hello,
first, thank you for this blog, I am following you
almost from the start and what you are doing is fantastic.
I have some troubles getting the logger working.
I have put jessie.lite on the sd card and then followed OTG setup.
I can successfully connect with Pi Zero via putty.exe (I get pi@raspberrypi:~ $)
Then, I don’t know how to connect to Pi using WinSCP (which file protocol to choose,
and which parameters?)
I’ve chosen SFTP and it gave errors that I don’t have permission
to change files (next step is to change cmdline.txt).
I then chose sudo -su shell under advanced settings and that allowed me to change files.
I also cannot run make just using ‘cd rtklib/app/str2str/gcc’ and then ‘make’
It says that I don’t have permission. If I first type ‘sudo su’ and then navigate to
‘cd rtklib/app/str2str/gcc’ and then ‘make’ it works, but gives me warning :
‘Warning: File ‘makefile’ has modification time (big number) in the future’.
I solved that with ‘find . -exec touch {} \;’ command and the warning is gone.
It stops when I try to run ‘str2str -in serial://ttyAMA0:230400#ubx -out rover.ubx -c /home/pi/gps/m8n_gpsglo_5hz.cmd’ as you did. It does not run, I have to type sudo su again and
then navigate to directory of str2str executable (I’m using 115200 and different name for cmd – provided
with demo5 win executables – m8n_base_1hz.cmd).
It then works, but when I continue to make startup script, it does nothing.
Would be really grateful for any help.
Best regards!
LikeLike
Hi Bene. Yes you’re right , WinSCP doesn’t let you modify files outside your user space, I’ll fix that oversight in my tutorial. The warning when you do the make is happening because your clock is wrong but I think you can ignore it. Before running str2str, I mentioned copying it to your local executable folder. Maybe you missed that step?, or maybe your config is a little different and you need to copy to a different folder? In the str2str command the 230400 is the baud rate, did you change that to 115200 when you ran that line? For debug, you can run str2str in four incrementally more complete steps. First run str2str directly as you did, then run the str2str_start script, then manually start the systemctl task, then enable the systemctl task and let the boot sequence start it. Which of these first fails in your case?
LikeLike
Thank you for your answer.
I did copy str2str to usr folder, and
it works if I run it manually.
The problem is, that it runs only if
I type sudo su after log in in putty and then navigate to folder where str2str is copied.
In your picture it is clear that it should work as pi@raspberrypi:~ $ (shown when you log in to putty). If i type str2str -in serial://ttyAMA0… command right after pi@raspberrypi:~ $ as in your picture, it says that I don’t have permission.
I think that the root of the problem is that I used sudo su shell in advenced settings in WinSCP (only that allowed me to copy rtklib files from pc to RPi zero). I copied all files from your demo5 github branch, is that ok? What settings did you use in WinSCP for logging in?(which protocol? Did you chhange anything under advenced settings?)
I really want to make this work, but I’m really not familliar with linux. I hope I’m not annoying, feel free to remove my posts, as they are probably trivial for most readers.
Best regards
LikeLike
You wouldn’t believe what caused the problems.
First, everything that is done inside home directory (copying rtklib files…) should not be done in sudo su shell (advenced settings in WinSCP).
The second problem were the ” signs in .sh script. I had to delete all your ” signs and type new ones in the same spot. The consequence was, that out file was not created and the error check in the script prevented it from running.
LikeLike
Hi Bene. That’s strange … I don’t know why the signs would make a difference but I’m glad you got it sorted out. I tried to follow the tutorial myself with a new SD card and ran into the same permission issues you did so I have updated the instructions to avoid any use of WinSCP outside of the user space. I also added a few images and a couple of intermediate checks so if anyone does run into a problem it may be more obvious where the problem is.
LikeLike
Thank you for an excellent tutorial! A few tips from my experience:
if you struggle with access denied in WinScp then just make the files via “nano” or “sudo nano” in the putty terminal, but remember copy paste doesn’t like ” and ‘
I had to set the permissions on str2str_start.sh via WinScp
My ublox LEA-M8T draws too much power so I could only access ssh with an extra USB for power connected
LikeLike
Hi Alxg. Thanks for the tips. I have had to connect an extra USB for power when using the Beaglebone, even with the Neo-M8N, but so far I’ve been fine with the Pi Zero but maybe I’ve just been lucky.
LikeLike
Hmm, anyone thought about creating a logger with an Arduino + SD card? Should be possible to send the init messages over serial? Or maybe just config everything in ublox and only log with two status leds or something which reads a ubx-nav message for nr of satelittes etc.
LikeLike
Looks great! Do you think a simpler serial-to-sdcard logger might suffice? I’m thinking of, e.g., SparkFun Logomatic and Adafruit Feather Adalogger:
https://www.sparkfun.com/products/12772
https://www.adafruit.com/product/2796
LikeLike
For just basic data logging the Sparkfun Openlog is smaller and less expensive. There are cheaper copies.
https://www.sparkfun.com/products/13712
http://www.readytoflyquads.com/rtf-blackbox-flight-data-recorder-cleanflight-openlog
I’d post some pics, but I don’t see an option for that.
LikeLike
Hi Felipe (and JB). I suspect the biggest issue with using a dedicated datalogger would be in initializing the GPS receiver at the beginning of the data collection. Each command in the RTKLIB startup command file needs to be translated correctly and a checksum calculated before sending to the GPS receiver. I believe writing custom code to do this would make this a more complicated solution than using the Zero. Maybe you are able compile the RTKLIB STR2STR app on these data loggers like I did, and setup up an autorun script but then the task would become very similar to using the Pi Zero. I also would be concerned you would lose some of the flexibility that the Pi Zero provides. Through socat you can get direct bi-directional connection with the receiver, STR2STR has the option to save the results in much smaller RTCM format if you are collecting large amounts of data, all data is output to the USB port while it is being collected so it gives the flexibility of plugging directly into the PC without reconfiguring. Hardware-wise, these data loggers use the same UART interface as the Zero, so there would be no difference there. And cost-wise, the dataloggers are more expensive than the Zero.
LikeLike
Here’s some useful code for using an Arduino-based SD-card logger. Especially the part about sending UBX messages (add header, checksum): https://stackoverflow.com/questions/23038037/ublox-neo-6m-ubx-command-sanity-check-with-fletcher-checksum
LikeLike
Hello !
As there is no RTC in the pi, did you try the python script from emlid to get the time and date from the gnss receiver ?
I didn’t had the time to test it yet.
https://github.com/emlid/ReachView/blob/master/reach_tools/gps_time.py
LikeLike
Hi Stephan. No I didn’t, but that would be a nice addition since it would enable you to put the correct date stamp in the data file names. In my script I just number the data files sequentially.
One issue you might run into is that although the tutorial I used to help me write the auto-start feature was intended to run a Python script I found it didn’t work with Python and ended up using a shell script instead. I originally used an older image of Raspbian, though, when I first wrote this script, and it’s possible that it would just work with the newer version I used in this example.
LikeLike